Search This Blog

Wednesday, November 16, 2011

Spaghetti Squash Fettuccine and Pan Roasted Brussels Sprouts

I know, I promised I wouldn't drop off the face of the earth again. But I did. Oops. I'll make it up to you somehow.

Okay, so winter squash is everywhere and its cheap. Awesome. Its also cheap calorie wise (42 calories per cup as opposed to 221 calories in a cup of cooked spaghetti pasta.) You know what that means? You can load on the sauce! I've made spaghetti squash with a tomato based sauce before and it was great, but I was really in the mood for some chicken fettuccine alfredo tonight. So I made it. And it rocked.

First, I roasted the spaghetti squash. Its really simple: cut squash in half, drizzle with olive oil, salt and pepper, place cut side down on a foil lined baking sheet and back in a 425 degree oven for 35-45 minutes or until you can slide a knife through it easily. Now all you have to do is scrape out the squash into a bowl. It will look a lot like a bowl of yellow pasta. Cool, right?


While the squash is cooking, you make the Alfredo sauce. I used half and half instead of cream so that cut the calories a little bit, but you don't have to. Remember, you're not eating pasta (you'll forget when you take a bite.) I threw in some of the leftover rotisserie chicken from last night (I love Costco) but you can make this vegetarian if you like. By the way, the nutmeg is pretty important to the alfredo sauce. Don't skip it, I promise it makes a big difference.

I still felt like I needed a vegetable to go with this meal. I had a huge bag of brussels sprouts (also from Costco) and I pan roasted them with garlic. I know a lot of people hate brussels sprouts, but they really don't suck. At least not like this (they still do if you boil them.)

Dinner turned out pretty yummy! The Bug even said "This is good, mommy!" and she ate more than 3 bites. Pretty amazing for her. 


Spaghetti Squash Alfredo

Ingredients:
1 whole spaghetti squash
2 Tbs olive oil
2 Tbs butter
2 cloves garlic, minced
1 cup half and half (or cream)
1/4 cup shredded parmesan cheese
Freshly grated nutmeg
Ground red pepper

For the Squash: 
1. Cut in half, lengthwise.
2. Drizzle with olive oil and season with salt and pepper.
3. Place cut side down on a foil lined baking sheet.
4. Bake in a 425 degree oven for 35-45 minutes
5. Scrape out squash into a bowl and cover with foil to keep warm.

For the Alfredo Sauce:
1. Heat butter over medium heat
2. Add garlic and sauté until fragrant
3. Slowly whisk in half and half and bring just to a boil.
4. Add parmesan and nutmeg, red pepper, salt and pepper to taste
5. Whisk together until smooth
6. Lower heat to low and let the sauce thicken.
7. Serve over  squash.


Pan Roasted Brussels Sprouts

Ingredients:
2-3 cups brussels sprouts-halved
2 Tbs olive oil
2 cloves garlic, minced
2 tsp lemon zest
Juice of half of 1 lemon

1. In a medium bowl, combine brussels sprouts, garlic, olive oil and season with salt and pepper.
2. Heat a large non stick skillet over medium high heat
3. Saute brussels sprouts until browned, stirring occasionally.
4. Transfer to a medium bowl, add lemon zest and lemon juice and toss to combine. Serve immediately.

Thursday, September 29, 2011

Its a cupcake...or is it?!?!


Yep, I'm opening with a picture. Isn't it beautiful? A cupcake with frosting and WAIT?!?! Is that bacon and chives?

Why yes my friend, it is. Things aren't always what they seem. I learned that from Aladdin.

Full disclosure, this isn't really a cupcake. Its a muffin. A quinoa muffin. I got the recipe from Martha Stewart and adapted it to make it less sweet. I omitted the raisins, only added 1/2 cup white sugar instead of brown sugar (I would use even less next time) and left out the vanilla. It makes a pretty dense, but delicious muffin.

For the "frosting" I mixed goat cheese and cream cheese (about half and half) in my food processor. It made a beautiful, creamy white frosting.

All that was left to do was sprinkle some chopped bacon and chives on there. I sat at the dinner table and patted myself on my back for quite a while last night. This turned out PERFECT. It was exactly what I was hoping for. A yummy muffin with the creamy, tart goat cheese frosting and the salty, crispy bacon on top. I made a potato and leek soup to go with it and let me tell you, we were all stuffed.

Oh, by the way, you could use just about whatever kind of not too sweet muffin you wanted to use. I think corn muffins would have been good too. I think I want to try and go even more savory next time and add some sauteed onions or something to the actual muffin.

Thursday, September 15, 2011

Grandpa's Super Secret Fudge Recipe

I'm about to do something that would make my grandpa Jim turn over in his grave. I'm going to share his secret fudge recipe with you.

The story that I heard was that my grandpa got this recipe from a woman who bought the recipe from a rather famous candy company. I don't know how true this was. My grandpa also swore up and down that he saw a unicorn in the woods when he worked for the Forest Service. Regardless of where the recipe came from, this will be the best fudge you've ever tasted.

I know, you have a fudge recipe that you make every Christmas and everyone says "oooh, yum, fudge." but its not as good as this recipe. I promise.

The first thing that you'll need is a well seasoned cast iron skillet. I've never made it in anything else. Don't try. If you don't have a cast iron skillet, go buy one. Why don't you already have one anyways? Geez.

The second thing that you'll need to know is that you're basically making a molten lava glue that will burn the bejeezus out of you if you get it anywhere on you. So don't. Along those same lines, make sure any little children or animals that you have running around your house are tucked snugly in bed or wherever you choose to keep them. Just keep them out of your kitchen.

So here's what you'll need:


1 12 oz package of semi sweet chocolate chips- I always use nestle'
Just under 1 cup of evaporated milk, maybe a tablespoon and a half less than a cup
13 regular sized marshmallows
1 tsp vanilla
1 cube of unsalted butter
1 cup nuts (optional)
2 cups sugar

As you can see by the picture, I didn't add nuts. I really like to add pecans and my mom adds walnuts a lot of the time. I want to try adding macadamia nuts next time. I skipped it this time because we're taking this batch with us over to some friends' house for dinner and I didn't know if they liked nuts or not. Better safe than sorry!

So your first step is to cut your cube of butter into small pieces and put that into the mixing bowl (I use my stand mixer.) Add the chocolate chips and the vanilla to that bowl as well


In your cast iron skillet, mix the sugar and evaporated milk together with a wire whisk. Add the marshmallows and heat over a medium-low heat. Adjust the heat as everything is melting so your mixture doesn't bubble over and create a huge, sticky monster mess.
This is what the mixture will look like when the marshmallows have just melted. Keep stirring and cooking.
It should look more like this. I don't even own a candy thermometer so I couldn't tell you what the temperature of it should be but it should be the color of a perfectly toasted marshmallow and it should separate easily when you run your whisk through it. This step might take some practice. Getting it dark enough is the key to keeping the fudge from being gritty but you have to make sure it doesn't burn either. No pressure, right?

When your marshmallow mixture is the perfect color and consistency, you will, CAREFULLY, pour it into the mixing bowl with the chocolate chips, butter and vanilla. I'm going to stress this, you're basically pouring sticky lava into another bowl from a scorching hot skillet. Don't get any on you!

All that's left is to mix it all up. Keep mixing until it starts to set up and then, using a spatula, smooth it all into a parchment paper lined, square baking pan (this is the only part of the recipe I changed from Grandpa's version. He greased the pan with butter, but I didn't like the greasiness of it on the bottom.) If you got the marshmallow mixture to the perfect temp this should set up at room temperature. If it doesn't set up quickly, stick it in the fridge. I usually do that anyways because I can hardly wait to taste it.


Hopefully Grandpa won't come back and haunt me for sharing this with all of you...


Monday, September 12, 2011

Corn Chowder-Lame title, good soup

I went to TWO farmer's markets last week! Look at me, supporting local stuff. I like being able to get produce that is so fresh and sometimes organic. The knowledge that they'll only be around for several more weeks makes me sad. I feel like we got shorted on summer a little bit this year (I wonder where I can send my complaint form.)

At the first market, on Thursday, my big purchase was a box of peaches, which I managed (with help from my sis) to can yesterday. They are awesome peaches, which is good because it made 10 quarts.

At the market on Friday I got corn. Awesome corn. Its grown organically by a farm that is owned by a friend of mine from high school. She doesn't usually come to our market but her truck broke down on the way to one on Thursday and she had to get the produce to a market, so we lucked out and got her!

On a side note, organic corn on the cob is not for the faint of stomach, or more specifically, those afraid of worms. Luckily for me, I'm not really bothered by them. They're just little caterpillar looking guys and we even got a big green one that my daughter was very excited about. It lead to a conversation that went like this:

Her: Mom, do you like caterpillars?
Me: Yep
Her: Do you like daddy caterpillars?
Me: Yep
Her: Do you like mommy caterpillars?
Me: Yep
Her: Do you like baby caterpillars?
Me:...

OK, back to the subject. So what does one do with 10 ears of corn (besides eat 4 of them for dinner the night we got them)?

You make Corn Chowder! Duh
Its so easy and so yummy. I barely even messed up my kitchen. In fact, I COULD have cleaned up the little mess I made while the potatoes were cooking and had a clean kitchen by the time we sat down for dinner. It didn't happen, I had important things to do, like check facebook or something, but in theory I could have.


This chowder has so much flavor for a soup that took under an hour to make. I'm pretty sure the key is making it in my big, green cast iron pot. I love meals that you just keep tossing ingredients into one pot.

Definitely serve this with a big, crusty/chewy piece of sourdough bread.

Oh yea! I almost forgot. I added this all up and there are only about 200 calories a serving. SCORE!


Corn Chowder
6 slices turkey bacon, chopped
1 medium onion, chopped
2 cloves garlic, minced
6 ears of corn, kernels stripped from the cob
2-3 large yellow flesh potatoes, cubed
2 cups half and half
1 cup fat free milk
Seasoning salt to taste
Pepper to taste
Ground red pepper to taste

Makes 8 servings

1. Saute onion and bacon together in a large, cast iron pot. This only works if you use pre-cooked turkey bacon. If you use regular bacon, you'll have to do cook these separately.
2. When the bacon is cooked through and the onion is softened, add the garlic and cook for 30 seconds or until fragrant.
3. Add the corn and saute for a couple minutes until everything has mixed together. Make sure and scrape up that browned goodness on the bottom of the pan. 
4. Dump in your potatoes, milk and half and half and give it all a good stir.
5. Add the seasonings to taste and let the chowder simmer until the potatoes have softened completely and start to fall apart. I even took my potato masher to it just to speed up the thickening process. The chowder should have a thicker consistency.
6. Serve immediately with crusty french bread or sourdough.


Sunday, September 4, 2011

Reinventing the wheel, or elbow, as it were...

Don't you love comfort food? That's a stupid question, I guess, because if you didn't love it, it wouldn't be comfort food. Well anyways, I don't think I've ever meet anyone who's said "I don't like Macaroni and Cheese." Well except for the instant stuff, but its not really the same thing, is it?

On the way home from Target (I insisted that we go tonight because I needed something essential for daily life, like vinegar or something, but really just wanted to get out of the house for a bit) I was thinking over what I had planned for dinner tonight. I knew Mac and Cheese was on the menu sometime soon as I had all the fixings for it but I wanted something different. Sometimes my Mac and Cheese ends up being a little like pasta nachos which isn't as good as it sounds. I grew with a pretty basic recipe that my mom would make (and we all loved!!!!) that was basically 1. Boil noodles 2. Put said noodles in a baking dish with Cheddar cheese and milk 3. Season to taste with salt and pepper 4. Turn your oven up as high as it will go and try to get it out before the smoke alarm goes off (sorry mom :)

Now don't get me wrong, we would all scarf down the stuff because it was delicious, but I wanted something different. I wanted creamy like Easy Mac but crunchy on top. I wanted the best of both worlds! And we got it!

It involves sauteing some onions and garlic in butter (I wonder how many recipes I can start like this...) and then making a sort of cheesy  Béchamel sauce with cheddar cheese, parmesan and this yummy Dubliner cheese


Now you're tasting your sauce and you're thinking, "What is this missing?" 
And not just any mustard, this Harvest Course Ground mustard. My sister-in-law bought some for some salmon that she made and it thankfully, got left in my fridge. This was EXACTLY what the sauce needed. Along with a little bit of ground red pepper.


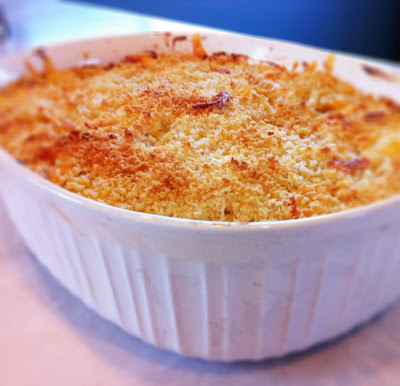
This all went in with the elbow pasta (which, by the way, was whole wheat because I'm , you know, healthy and stuff) it was topped with more shredded cheese to give it that melty top and then some panko bread crumbs and a few dollops of butter to make the bread crumbs all golden brown. This is what came out:


I should have taken a picture of the inside but I didn't have the patience. It was very creamy and not at all nacho like. 

For dessert I made these babies (well, I made them last night.) 

Just basic little sugar cookies iced with almond bark and sprinkles. Kind of an imitation Circus Animal cookie, which my husband LOVES. I'll be honest, I sort of like them too. 


NEW Macaroni and Cheese

Ingredients
1 box elbow pasta (whole wheat if you're into that sort of stuff)
3T Butter
1/4 minced onion
2t minced garlic (or more, I won't judge)
1T flour
1/2-1 C half and half or milk
1 T Harvest Course Ground Mustard
1/2 t ground red pepper
1 C shredded Cheddar
1/2 C Dubliner Cheese
1/4 C Parmesan Cheese
1/2 CPanko bread crumbs

Preheat oven to 400 degrees
1. Boil pasta according to box until its almost done. It will cook a little more in the oven. Drain and place in a large baking dish.
2. Shred all the cheese and mix it together in a large bowl.
3. Saute onions in 1 T butter until translucent and then add the garlic, saute for 30 seconds or until the garlic is fragrant.
4. Add 1 T butter and let it foam. After that subsides, whisk in the flour and cook until it browns up a little.
5. Whisk in the milk, mustard and red pepper and then season to taste with salt and pepper. Let this thicken up a little.
6. Add all but about a handful of the shredded cheese to your bechamel sauce and stir until its creamy and thick.
7. Pour sauce over pasta in baking dish and stir until its all combined. Sprinkle remaining cheese over the top and then sprinkle the bread crumbs over the top. Place thin slices of the remaining tablespoon of butter over the bread crumbs
8. Bake in preheated oven for 15 min or until top is golden brown. Serve immediately. 


Tuesday, August 16, 2011

At least I didn't break anything...

You know, when I fell off the face of the earth :) hehe...

OK, so this summer has been INSANE. A good insane, but insane nonetheless. We've had such good times with family and friends and those good times included some amazing food (and maybe just a little wine...)
Unfortunately, I didn't have the ambition at the end of the day to document those meals. I'll just tell you, they were good.

Things have slowed down a little in the last week or so and I've been able to make a couple of meals for my family. One of them was some grilled mahi mahi which was tasty but nothing super special; heat the grill, stick some fish, olive oil, thyme, lemon, salt and pepper in some tin foil and cook for 10 min or so. Pretty easy. I made this pretty little salad to go with it


Its sort a caprese salad, but instead of fresh mozzarella I used avocados, and instead of basil I used thyme. Oh yea, there's a balsamic dressing over it too. 

Also one night I wanted pizza, but you know, pizza is BAD for you or something...So I made it anyways, but instead of a normal crust I used tortillas. This was SO easy. And not at all ground breaking, but it was yummy.


Just pile on your normal pizza toppings and pop it into a 400 degree oven until it turns pretty (which means melted, browned mozzarella).

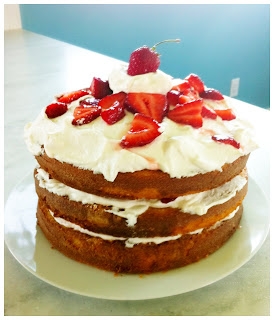
The last thing I remembered to take a picture of was an amazing strawberry shortcake. 

I got the recipe out of a Magnolia Bakery cookbook. I thought about sharing the recipe with you, but I'm going to force you to do yourself a favor and buy the cookbook. Its my dessert bible. I love it and I'll be eternally grateful to my Mother-in-law for buying it for me.


So I'll try not to disappear again anytime soon. Tonight I'm making scallops like I saw my sister-in-law make this summer. I'm excited!


Thursday, July 14, 2011

Summer Vegetable Chicken and Barley Soup

It was unseasonably cold here today. I expect July to be in the 90's and today it didn't even hit 80. This put me in the mood for soup. I know, not really soup weather, but I was being dramatic.

I decided to make a vegetable soup with barley and chicken, mostly because those were the ingredients that I had. So I dove into my fridge and pantry and pulled out whatever looked good.


The only chicken I had was frozen chicken breast so I stuck that in my cast iron pot and boiled it in salty water until I could shred it. Yes, I boiled the chicken. Because its easy, that's why.
I added a lot of garlic to my soup, like 6-8 cloves. I really like the stuff and my philosophy on it is there is no such thing as too much garlic. I didn't mince it either. I like finding a big chunk of it, so I just coarsely chopped it.


I have to confess, the only time I've ever had barley before was in a Campbell's condensed soup. You can understand my blasè attitude towards the grain. I'd always thought it mushy, but it didn't end up that way at all. In fact, next to the corn, it was my favorite component of the whole soup. 

The corn though, let me tell you about the corn. I got really lucky at WalMart today. They had really yummy corn. So juicy and sweet. So lucky. And it was perfect for this summery soup. After I cut all the kernels off the cob, I threw the cob in the pot too and let it simmer with all the veggies. Good move, me! Even my husband said he could taste the sweet corn flavor throughout the whole soup. That made me happy. Don't you just love it when something you decide to do on a whim turns out awesome?

This was such an easy soup, if only a little time consuming (the barley actually takes about 15 min to cook.) It really hit the spot. I served it with the left over pita bread from Tuesday, only I brushed them with some olive oil, sprinkled on some garlic powder, shredded Parmesan cheese, and dried rosemary and broiled it in my oven for a few minutes.
Yes, I know its basil in the picture. I changed my mind, OK?!?!

This soup did an excellent job of warding off the chill of this actually, perfectly mild weathered day.


Summer Vegetable Chicken and Barley Soup
2 Cups shredded chicken
1 onion, sliced and sauteed in olive oil
6-8 cloves of garlic, chopped and sauteed
2 small zucchini, slice and sauteed
4 cups chicken broth
add water to desired consistency 
dried thyme
dried rosemary
1 ear of corn (don't forget the cob!)
1 1/2 cups barley
2 tomatoes 
salt and pepper to taste